MobX Architecture in Production
What I enjoy about being a developer is teamwork, learning from other professionals, and helping others grow. I like to discuss good practices and talk about trending technologies with my colleagues. I consider myself a self-taught person and I do my best to make a quality product. On a daily basis, I use React, Typescript, TDD with Jest, Testing Library, Cypress, and Redux when necessary.
MobX is a popular choice for managing application state, according to NPM statistics is downloaded over 600,000 times per week and is compatible with any Javascript framework and even Flutter.
MobX is not opinionated, so keep in mind that there is not one but many ways to build an app with MobX. This article will show one of them.
The architecture goal is to provide a familiar codebase to beginners and OOP developers without sacrificing react performance and simplicity. In the process, you will discover that MobX is awesome!.
Throughout the tutorial we will answer these questions:
- How MobX works?
- How to organize the MobX code and project folders?
- How to avoid showing a lot of loading spinners?
- How to do unit testing and integration testing?
- What are the pitfalls of the architecture proposed?
How MobX works?
It is out of the scope of this article to explain in-depth how MobX works. In plain words, MobX detects state changes automatically and transparently to the user using the observer pattern. The technical term is Transparent functional reactive programming (TFRP) and just to clarify is different from RxJS, as you can read here).
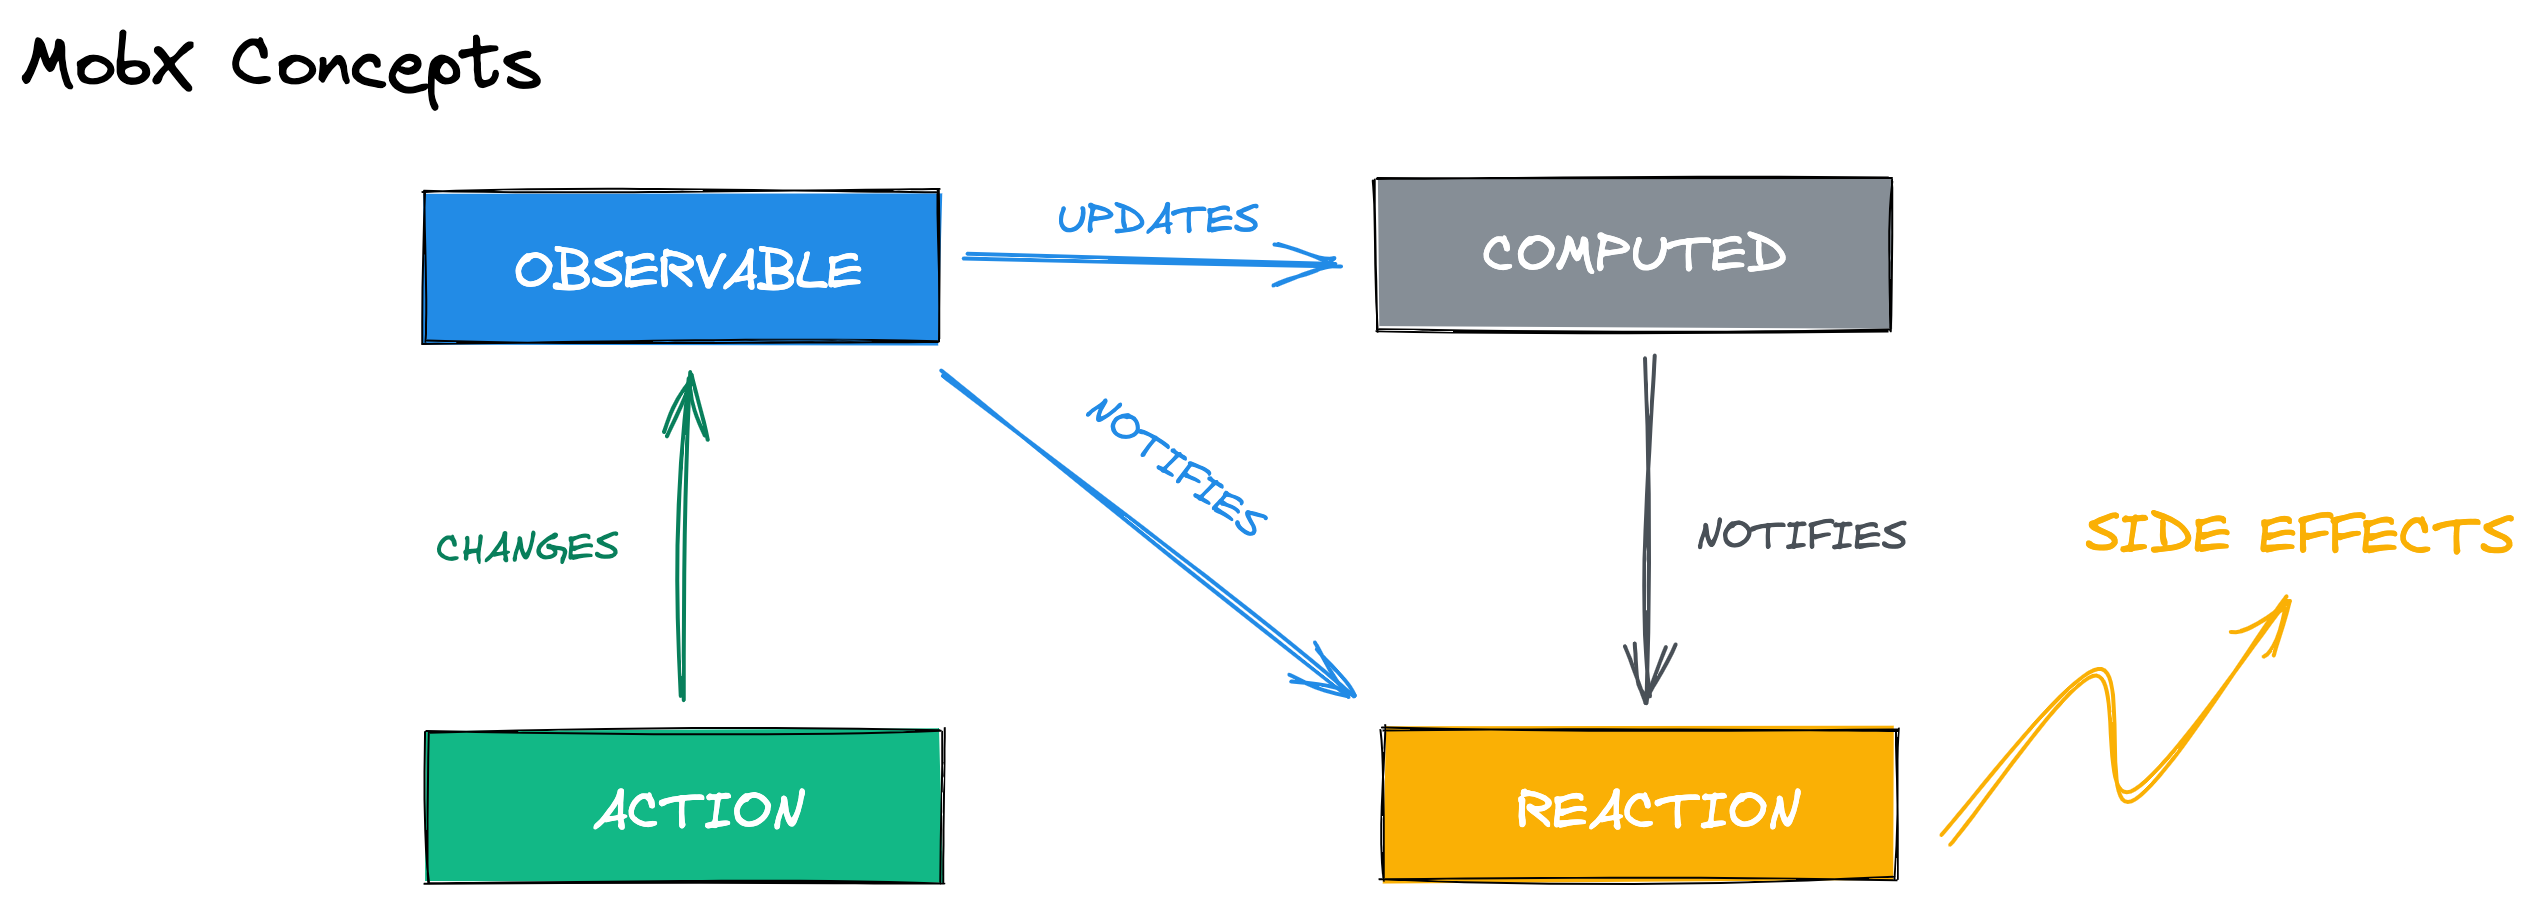
It has 4 main concepts:
- Observable: It is the value that notifies its changes. Like the state of the React components, it also has a default value.
- Computed: It is a function that returns a value. The returned value is stored in the MobX cache, as long as the observables or computed on which it depends have not changed it will immediately return the previously computed value without having to run the function again. Like an observable, when the returned value changes, notifies its changes.
- Reaction: A reaction is an observer, a function that runs again when the observables/computed on which depends have been changed, the difference with the computed functions is that reactions do not return a value, instead execute side effects, for example, re-rendering a component is a side effect.
- Action: Actions allow changing observables, grouping the changes in a single notification that will be sent only when the action has finished executing.
Let's see the concepts with an example: We will create a CounterStore using an
import { observable, computed, action, makeObservable } from 'mobx'

class CounterStore {
  constructor() {
    makeObservable(this)
  }

  @observable
  count: number = 0

  @computed
  get isGreatherThan5() {
    return this.count > 5
  }

  @action
  increment() {
    this.count += 1
  }
}

export const counterStore = new CounterStore()
It is necessary to use makeObservable(this) inside the CounterStore constructor, makeObservable will make MobX to correctly identify the class content.
import { counterStore } from './CounterStore'
import { observer } from 'mobx-react'

export const DisplayCountValue = observer(() => {
  return <p>Count value is {counterStore.count}</p>
})
As MobX documentation says:
"The observer HoC automatically subscribes React components to any observables that are used during rendering. As a result, components will automatically re-render when relevant observables change. It also makes sure that components don't re-render when there are no relevant changes. So, observables that are accessible by the component, but not actually read, won't ever cause a re-render".
import { counterStore } from './CounterStore'
import { observer } from 'mobx-react'

export const IncrementButton = observer(() => {
  return (
    <button
      onClick={() => counterStore.increment()}
      disabled={counterStore.isGreatherThan5}>
      Increment count
    </button>
  )
})
Thanks to MobX:
- The <DisplayCountValue > component is only rendered the first time it appears on the screen and when
CounterStore.countchanges its value to show the user the new number. - The <IncrementButton /> component is only rendered on mount and when
CounterStore.isGreatherThan5is true to disable the button.
Please read the official documentation to understand better the concepts.
Let's start
First, we will divide the application code into layers, always focusing on not overload of responsibilities one layer.
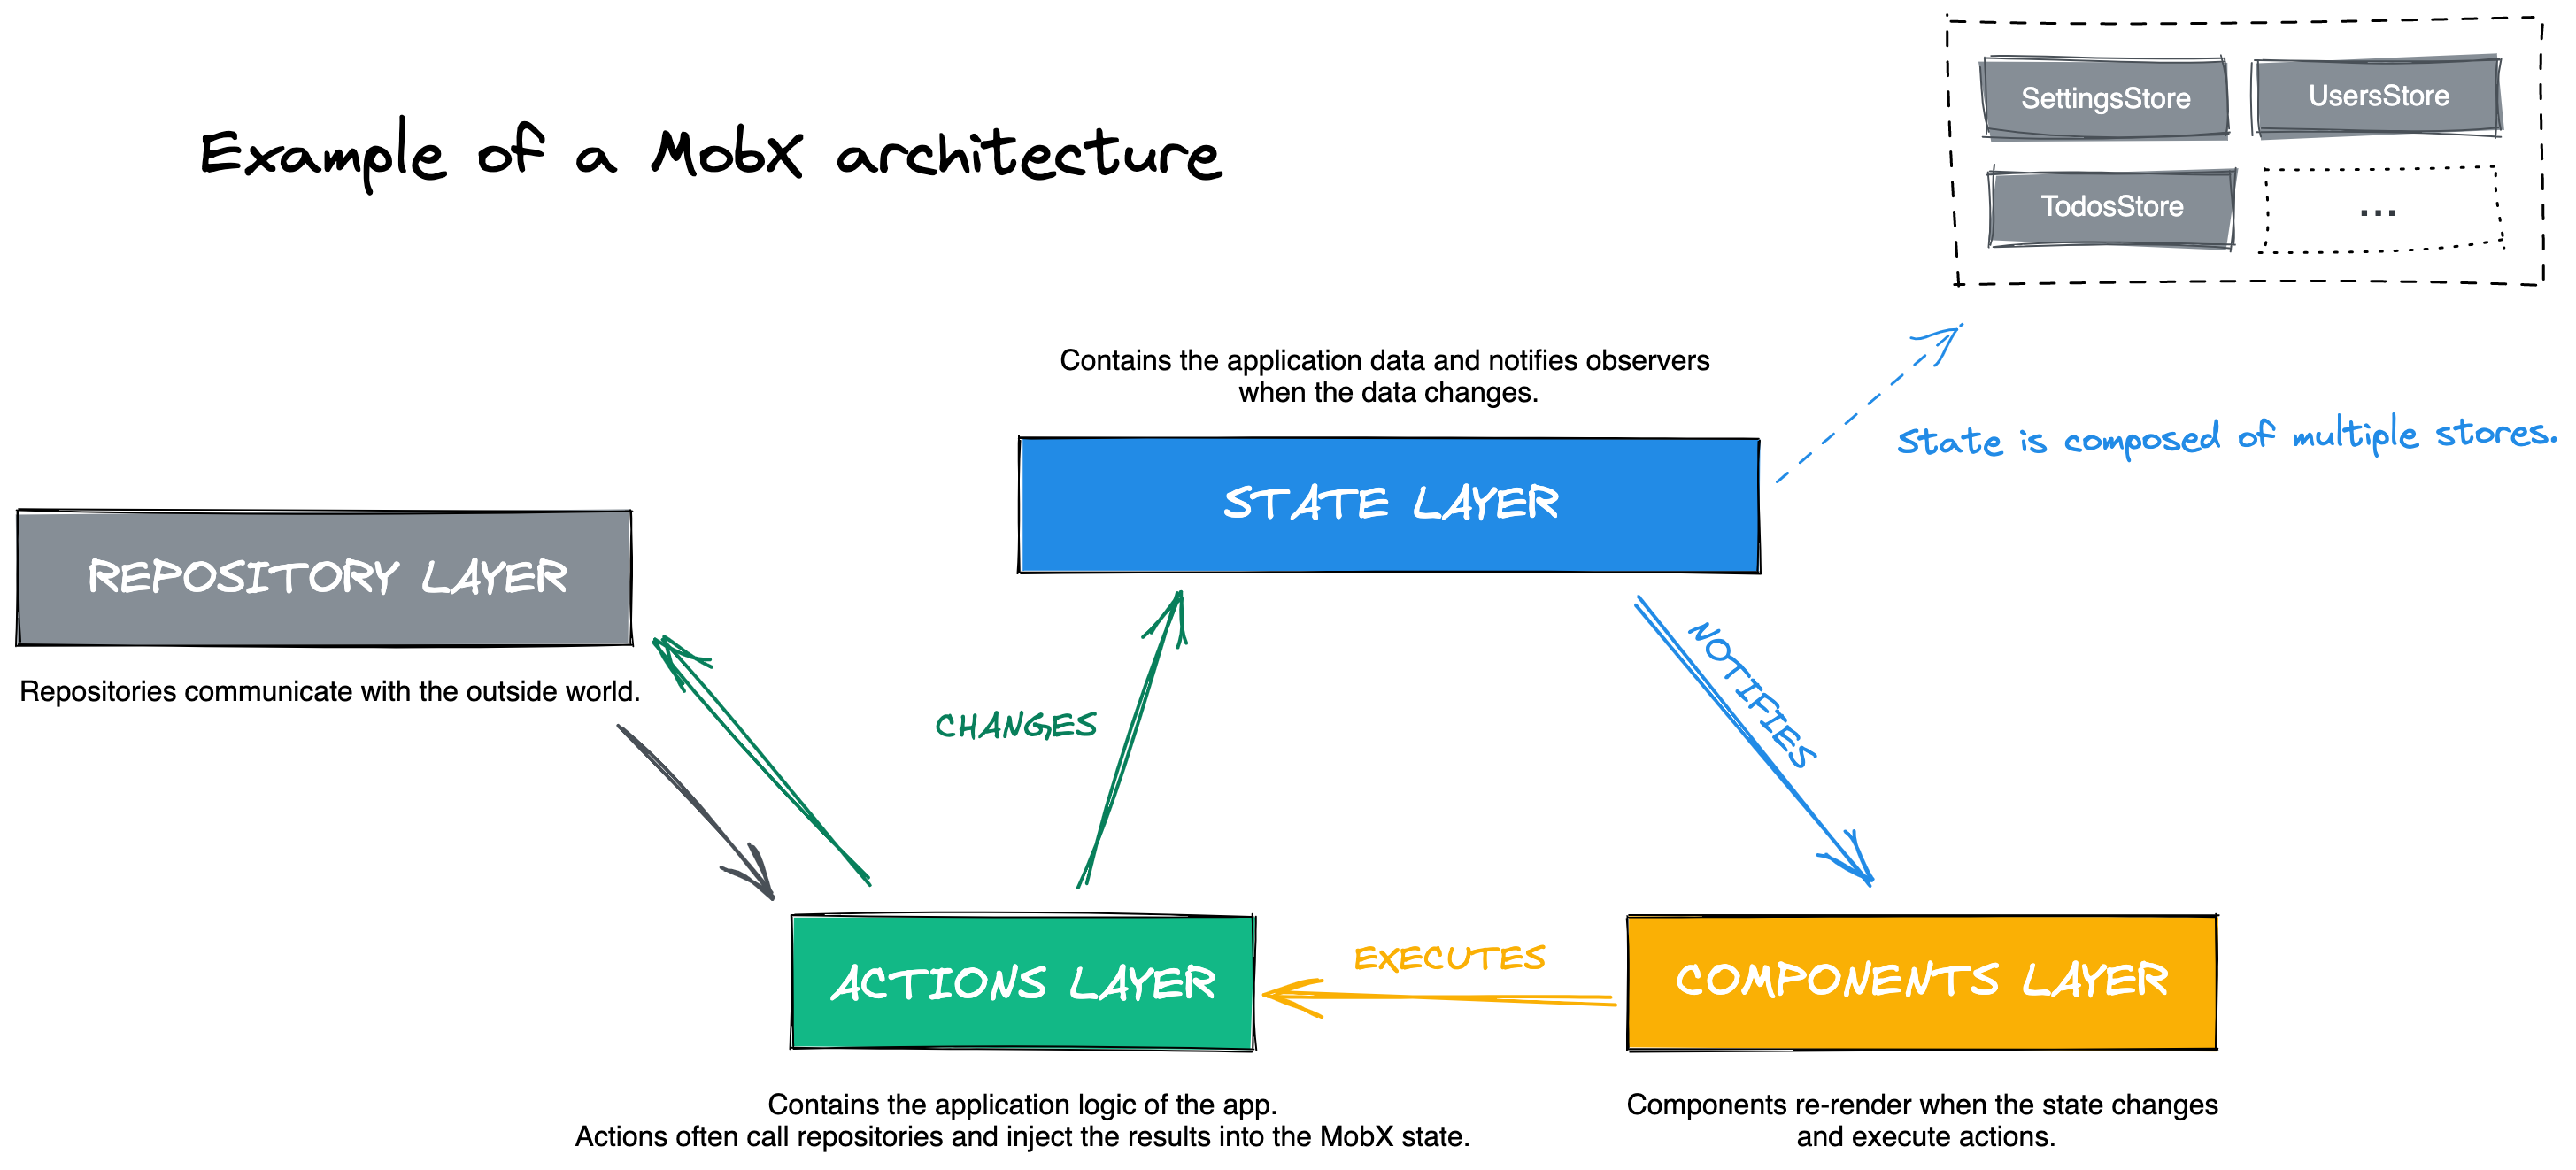
Stores
Holds the global state of the application, its main responsibility is to notify components when its data changes. The global state is composed of multiple stores, and each store could be categorized as a UI Store or Domain Store.
- UI Stores contain data related to the UI, like the currently active theme, the selected language, etc. Often there is only one UI Store for the entire application.
- Domain Stores contains the data related to the Domain, each Domain should be expressed using its own store. For example (UsersStore, ProductsStore, etc.).
As we saw in the Store's example above and within the MobX documentation, the actions are also defined inside the Store. We'll take a different approach to ease the asynchronous action handling and maintainability.
Actions
Are responsible for what the application does, the interactions that a user can make in the application. For example, logging in, logging out, saving a form, etc.
The action will update the store, often will call an API to obtain the data and then will update the store with that data.
An action is represented by a class with an execute decorated with the MobX @action decorator.
Repositories
This layer responsibility is to access the data outside the application. Repositories centralize common data access functionality, for example, UserRepository could have getUser(), createUser() methods. Most of the time, the data source will be a back-end server or the local storage.
Components
Components display the data within the stores and execute actions. Sometimes have its own local state. For example the form state, action loading state, etc.
Dependency Injection
Sooner or later a class needs to make use of another class and when that happens, pass the class you need by the constructor, this way will be easier to refactor, reutilice and test. But you will still need to create the classes instance manually, a good way to avoid that is using dependency injection, a tool that automatically creates the classes instance and registers them inside a container, then whenever you use a class, the container will give you the registered class instance. We choosed TSyringe , we'll see how is used in the next sections.
Show me the code
You can skip this if you want and just get to the code, or follow along with the example over on
In this example, we'll see the architecture explained above using a todo app.
The app will consist of:
- A <TodosList > component to display a list of todos, on its first render will call
LoadTodosAction LoadTodosActionwill make a call toTodosRepository.getTodos()- If the call is successful will update the
TodosStore.todos - <TodosList > component observes the changes of
TodosStore.todosand re-renders. - <NewTodoForm > with a button that executes a
AddTodoAction AddTodoActionwill make a call toTodosRepository.createTodo()- If
TodosRepository.createTodo()is successful, it will callLoadTodosActionto get the new todos from the API and re-render the <NewTodoForm > component.
Because we don't have a real back-end, we will use Mock Service Worker (MSW) to mock a REST API for the todos.
This demonstrates:
- Initiating an Action directly from a Component
- Executing an Action within another (chaining)
- Using a Repository inside an Action and then updating the Store
- Component:Store binding.
- Unit and integration testing
Main dependencies used in the project
- mobx: This is the main library that provides us with all the MobX APIs.
- mobx-react: It offers utils functions to make it easier to work with MobX in React.
- TSyringe: A lightweight dependency injection container for TypeScript/JavaScript for constructor injection.
- jest-mock-extended: Is a Type safe mocking extensions for Jest. Supports mocking deep objects / class instances.
MobX Configuration
In the beginning, is helpful to configure MobX to be as strict as possible. On index.ts we have added:
import { configure } from "mobx"

configure({
    enforceActions: "always",
    computedRequiresReaction: true,
    reactionRequiresObservable: true,
    observableRequiresReaction: true,
    disableErrorBoundaries: true
})
Now MobX can "lint" your code at runtime if you don't follow the patterns correctly. More information on what it does on the official MobX documentation
Let's see the store
import { computed, makeObservable, observable } from 'mobx'
import { singleton } from 'tsyringe'
import { ITodo } from 'modules/todo/data-access/interfaces/ITodo'

@singleton()
export class TodosStore {
  constructor() {
    makeObservable(this)
  }

  @observable
  todos: ITodo[] = []
}
It is important that there is only one instance of a store. The decorator @singleton is provided by TSyringe to
register in its dependency container the instance of the class.
Repository
import { singleton } from 'tsyringe'
import { ITodo } from 'modules/todo/data-access/interfaces/ITodo'

@singleton()
export class TodosRepository {

  async getTodos(): Promise<ITodo[]> {
    const response = await fetch('/todos')
    return await response.json()
  }

  async createTodo(name: string): Promise<void> {
    await fetch('/todos', {
      method: 'post',
      body: JSON.stringify({ name }),
      headers: {
        'Content-Type': 'application/json',
      }
    })
  }
}
Actions
export interface IAction<Param = unknown> {
  execute(param: Param): Promise<void>
}
import { action, makeObservable, runInAction } from 'mobx'
import { singleton } from 'tsyringe'
import { IAction } from 'shared/arch/interfaces/IAction'
import { TodosStore } from 'modules/todo/data-access/stores/TodosStore'
import { TodosRepository } from 'modules/todo/data-access/repositories/TodosRepository'

@singleton()
export class LoadTodosAction implements IAction {
  constructor(private todoStore: TodosStore, private todosRepo: TodosRepository) {
    makeObservable(this)
  }

  @action
  async execute() {
    const todos = await this.todosRepo.getTodos()

    runInAction(() => {
        this.todoStore.todos = todos
      }
    )
  }
}
An action is also decorated with @singleton and it is important to pass by constructor the dependencies, it allow TSyringe to get the instance automatically and also makes the testing easier.
Do not forget to add inside the constructor the line makeObservable(this) and annotate the execute method
with @action in order for MobX to correctly identify the class.
And after an asynchronous operation, any code that modifies an observable needs to be wrapped using the runInAction
API. You can read why at the official documentation.
import { FC, useEffect } from 'react'
import { observer } from 'mobx-react'
import { container } from 'tsyringe'
import { TodosStore } from 'modules/todos/data-access/stores/TodosStore'

export const TodosList: FC = observer(() => {
  const { todos } = container.resolve(TodosStore)

  return (
    <ul>
      {todos.map((todo) => (
        <li key={todo.id}>
          <span>{todo.text}</span>
          <input
            type='checkbox'
            checked={todo.isComplete}
            data-testid={`todo-checkbox-${todo.id}`}
          />
        </li>
      ))}
    </ul>
  )
})
Using container.resolve we retrieve the store and thanks to the HOC observer, we re-render the component when there
are changes in TodosStore.todos. The observer HOC in MobX terms is a reaction because behind the scenes is using an
MobX API to track the component observables.
We need to execute LoadTodosAction after the component renders for the first time. We could do it adding this lines of
code:
const [isLoading, setLoading] = useState(false)
const loadTodosAction = container.resolve(LoadTodosAction)

useEffect(() => {
  setLoading(true)
  loadTodosAction.execute().then(() => setLoading(false))
}, [loadTodosAction])

if (isLoading) {
  return <p>Todos loading...</p>
}
We can do it better by refactoring the code using a custom hook to handle the execution of the actions.
useAction hook receives the Action and returns a function that run its execute method.
import { useCallback } from 'react'
import { container, InjectionToken } from 'tsyringe'
import { IAction } from 'shared/arch/interfaces/IAction'

export const useAction = <Param>(action: InjectionToken<IAction<Param>>) => {
  const actionInstance = container.resolve(action)

  const handleExecute = useCallback(
    async (param: Param) => {
      await actionInstance.execute(param)
    },
    [actionInstance]
  )

  return handleExecute
}
As an action can be asynchronous, create another hook to manage the action loading state that is local to the component where the action is used.
import { useCallback, useState } from 'react'
import { InjectionToken } from 'tsyringe'
import { IAction } from 'shared/arch/interfaces/IAction'
import { useAction } from 'shared/arch/hooks/useAction'

export const useActionLoadable = <Param>(action: InjectionToken<IAction<Param>>) => {
  const [isLoading, setLoading] = useState(false)
  const execute = useAction(action)

  const handleExecute = useCallback(
    async (param: Param) => {
      try {
        setLoading(true)
        await execute(param)
        setLoading(false)
      } catch (error) {
        setLoading(false)
        throw error
      }
    },
    [execute]
  )

  return [handleExecute, isLoading] as const
}
Because the loading state is local to the component and an action could execute other actions,
Now let's refactor the code of the <TodosList> component
import { FC, useEffect } from 'react'
import { observer } from 'mobx-react'
import { container } from 'tsyringe'
import { TodosStore } from 'modules/todos/data-access/stores/TodosStore'
import { LoadTodosAction } from 'modules/todos/data-access/actions/LoadTodosAction'
import { useActionLoadable } from 'shared/arch/hooks/useActionLoadable'
import { useAction } from 'shared/arch/hooks/useAction'

export const TodosList: FC = observer(() => {
  const { todos } = container.resolve(TodosStore)
  const [loadTodos, isLoading] = useActionLoadable(LoadTodosAction)

  useEffect(() => {
    loadTodos(undefined)
  }, [loadTodos])

  if (isLoading) {
    return <p>Loading todos...</p>
  }

  return (
    <ul>
      {todos.map((todo) => (
        <li key={todo.id}>
          <span>{todo.text}</span>
          <input
            type='checkbox'
            checked={todo.isComplete}
            data-testid={`todo-checkbox-${todo.id}`}
          />
        </li>
      ))}
    </ul>
  )
})
We now have the <TodosList> component entirely implemented!
Testing
Let's also see some testing, the rest of the components and actions can be seen implemented in the repository at GitHub repository.
It is up to you to decide what granularity of testing you prefer in your project. I will show you how to implement unit tests using jest and integration tests of React components using testing library.
Jest Configuration
Inside the setupTests.ts file it is important to disable the restriction of using actions to modify the state in MobX, since within tests there will be times that we will skip that rule and we do not want to receive a warning by console. Also before running each test, we are going to clean the instances that have been registered in the TSyringe container.
import 'reflect-metadata'
import '@testing-library/jest-dom/extend-expect'
import { configure } from 'mobx'
import { container } from 'tsyringe'

configure({
  // disables mobx action warning
  enforceActions: 'never',
})

beforeEach(() => {
  // clear all registered tokens within tests
  container.clearInstances()
})
Unit testing example using jest-mock-advanced
For example, let's test the load todos action
import { mock } from 'jest-mock-extended'
import { TodosStore } from 'modules/todo/data-access/stores/TodosStore'
import { TodosRepository } from 'modules/todo/data-access/repositories/TodosRepository'
import { LoadTodosAction } from 'modules/todo/data-access/actions/LoadTodosAction'
import { ITodo } from 'modules/todo/data-access/interfaces/ITodo'

describe('LoadTodosAction', () => {
  it('should load todos', async () => {
    const { loadTodosAction, todosStore, todosRepository } = setup()

    const todos: ITodo[] = [{ id: 200, text: 'Lorem ipsum..', isComplete: false }]
    todosRepository.getTodos.mockResolvedValue(todos)

    await loadTodosAction.execute()

    expect(todosStore.todos).toEqual(todos)
  })
})

function setup() {
  const todosStore = mock<TodosStore>()
  const todosRepository = mock<TodosRepository>()

  return {
    todosStore,
    todosRepository,
    loadTodosAction: new LoadTodosAction(todosStore, todosRepository)
  }
}
setup() is a function used to set up the dependencies that are going to be used inside the test. Usually inside it we
will mock the store, repositories and sometimes setup function will also receive arguments to help with the mocking
data.
Integration test example using testing-library
In an integration test I recommend mocking as little as possible, often mocking the repositories is enough. Don't forget to verify that the mocks have been called correctly!
import { render, screen, waitFor } from '@testing-library/react'
import userEvent from '@testing-library/user-event'
import { mock } from 'jest-mock-extended'
import { container } from 'tsyringe'
import { TodosRepository } from 'modules/todo/data-access/repositories/TodosRepository'
import { TodosList } from 'modules/todo/components/TodosList'
import { ITodo } from 'modules/todo/data-access/interfaces/ITodo'

describe('TodosList', () => {
  it('should render todos', async () => {
    setup([{
      id: 1,
      text: 'Learn MobX',
      isComplete: false
    }])

    expect(screen.queryByText('Loading todos...')).toBeInTheDocument()

    await waitFor(() => {
      expect(screen.getByText('Learn MobX')).toBeInTheDocument()
    })
  })
})

function setup(todos: ITodo[]) {
  const todosRepository = mock<TodosRepository>()
  container.registerInstance(TodosRepository, todosRepository)

  todosRepository.getTodos.mockResolvedValue(todos)

  render(<TodosList />)

  return {
    todosRepository
  }
}
We could also use Mock Service Worker (MSW) to mock the todos API, it's up to you.
I prefer to mock the repository class using jest-mock-extended because is more easier to see what is mocked, and also is easier to verify that the repository was called with the expected params.
Other practices used in the todo app
As I said before, this architecture is very opinionated and there are some more practices I personally follow:
- Absolute imports: Is easier to understand where things are from. If you want to learn how to configure it you can do it here
- Interfaces Prefixed with "I": Clearly identifies that it IS an interface. I only apply the prefix when the interface has its own file and is exported. I do it this way because I want to know that the file is an interface without entering the file and also that the interface is used in other code files.
- Named exports: They are easier to rename and enforces consistency in the names wherever you import them.
Folder structure:
./src
├── modules
│   └── todo
│       ├── components
│       └── data-access
│           ├── actions
│           ├── interfaces
│           ├── repositories
│           └── stores
├── shared
│   └── arch
│       ├── hooks
│       └── interfaces
└── test-utils
  └── mocks
The
shareddirectory contains custom hooks, constants, components, interfaces, utility functions, etc. that are reused across the project.- The
modulesdirectory is made of smaller self-contained modules. Each module could contain a components folder, data-access, and utils folder. A good module:- Represents a page in the application or a collection of pages that form a feature.
- Rarely needs to use data from other modules' data-access directory.
- Doesn't contain data that is often required by other modules.
- The
data-accessdirectory inside of each module contains any code that is related to the global state of that module, any actions that can modify that state and also the interfaces used across that data-access folders and the repositories to access the data from an external API.
Looking at modules directory content and data-access/actions you should be able to find out what the application does!
Pitfalls
Not everything shines and there are some pitfalls I have encountered with this approach:
- Because we are using decorators and create-react-app doesn't support them out of the box, we will need to modify the babel configuration using a library like craco if you don't want to eject.
- The code will complain about missing interfaces or types exports, and it can be solved by changing the imports from
import { TypeOrInterface } from...toimport type { TypeOrInterface } from .... See babel-plugin-transform-typescript-metadata current pitfalls for more details. - If you use named exports to export a component, the component name will not be visible on React dev-tools, there are some workarounds as you can see here, personally, I set manually the name using
MyComponent.displayName = "MyComponent", be aware that doing it this way, in production, the component name is not minified and everyone can see it. - Sometimes you will need to log an observable, but before doing it you will need to transform it back to a plain object using MobX toJS method.
All of these pitfalls don't have a big impact on me, I can deal with them. But you need to know them, maybe for you are more important.
That's all, let me know what you think in the comments below :)
Have a good day and happy coding!